Beginner’s Guide: How To Set Up Google Ads Search Campaigns [VIDEO]
Google Ads is a great marketing tool (if executed properly) and many businesses out there are taking advantage of it.
Its popularity amongst all sorts of different advertisers has been on a constant rise since the launch in 2000 and isn’t showing any signs of slowing down.

However, this post is not here to persuade you of the benefits of Google Ads. If you are reading this you must already know that Google Ads is the next step to take for growing your business. That’s great!

But I’m guessing you either don’t know how (yet) or you have some ideas but want to validate them and maybe get some more insight about best practices. Keep reading and I’ll give you an easy foolproof quick-win way to set up your Google Ads search campaigns.
Stay tuned till the end where I give you a few insider tips.
Watch the article in video format and follow our setup instructions step-by-step
Why should I even have more than one campaign?
Many people starting with Google Ads don’t even ask themselves this question. Well, you should. As with everything, there’s no point in overthinking it but you’ll thank yourself later if you did some planning in advance.
Before establishing how many campaigns to use and how to structure them you should look at your range of products/services and ask yourself how they differ from each other when it comes to profitability for example.
The campaign level settings allow you to set:
- A budget
- Language targeting
- Location targeting
- Device targeting
- Bidding strategy
- Ad schedule
- Ad delivery
And some other a little more advanced settings. But more on all of these in a bit.
So if you want all these settings to be the same for all your products/services do you really need more than one campaign? Technically, no.
But, if you want to have different settings for different product/service groups it makes all the sense in the world to have separate campaigns for them.
For example, let’s say you’re selling women’s clothes – outerwear, dresses, jeans. Dresses are your best selling product group and you get the most revenue from selling them. In this case it would make sense to bid more on these products and allocate more of your advertising budget to them.
Even if you want to start with all the same settings for all your product/service groups it might still be nice to have them in different campaigns for more clear analysis.
1. Structure by product/service groups
This is definitely the most common and clear way to structure your campaigns when it comes to ease of analysis.
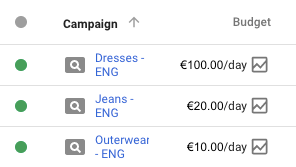
As the title says, you should structure your campaigns according to the groups of products/services that you offer. Let’s come back to the clothing store example. In this case, it would make sense to have different campaigns for outerwear, dresses and jeans. This structure allows you to set different settings for different product groups.
You may want to allocate a different portion of your budget to each campaign (product group). And even if you want to start off with an equal or shared budget for them all, you can modify the budgets’ proportions later once you have already gathered some valuable performance data.
If you want to advertise in more than one country and have different budgets for all countries you can create separate campaigns for different countries. For example:
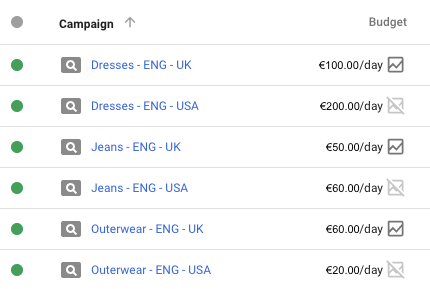
This allows you to analyse the performance of all product groups in all countries with ease. 🙂
So let’s say you have a budget of 250€/day for advertising all your clothes. If you’re only starting to sell your products and don’t yet have an idea of which ones are most profitable, you can set up a shared budget (Settings icon in top right corner > Shared Library > Shared Budgets > +) and add all your campaigns to this budget.

After a few days this lets you see the proportions each campaign (product group) is spending from the 250€ and soon enough you can set individual budgets for all your Google Ads search campaigns based on the data you’ve gathered.
Shared budgets are also great for starting off with advertising in different countries. If you have 250€/day for USA and 150€/day for UK you can just create 2 different shared budgets:

And all necessary campaigns can be under each shared budget.
2. Structure by product/service groups + keyword match types
This structure is similar to the last but a tiny bit more granular as it allows you to set different budgets and bids for different keyword match types.
This structure allows you to differentiate between people that search for the exact search terms that you have set as keywords and those who are searching for something more general or broad. Usually the people that are looking for something exactly like what you are offering, are more valuable to you so it makes sense to want to allocate more of your budget to them.
For example when your keyword is “yellow dresses” then the Exact Match campaign is used when the person searches for “yellow dresses”. When the person searches for “yellow floral print midi dresses” they will be shown ads from the Broad Match Modified match type campaign.
Naturally, the person searching for the first option is more likely happy with what you have to offer and is more likely to convert (make a purchase).
In this case your list of Google Ads search campaigns would look something like this:

You really should consider though if you’re going to want to differentiate between these two match types as there’s no point in setting up your account like this if you’re just going to end up optimizing (article coming up on optimizing) them the same way and hence just doubling your workload.
P.S. Stay tuned for the next article in our Google Ads Beginner’s Guide that discusses keywords and match types. 🙂
3. Structure by profitability
Like the title says this method means you’d divide your products/services into however many groups you’d like by their profitability or importance.
The first one would be for the products/services that are most profitable to you and you’d want to have a bigger portion of your budget allocated to them. You’d also be willing to pay more for the traffic since you know you’ll earn more money if you sell these products. The rest would be for less profitable ones that you don’t want to spend too much on.
Your Google Ads campaigns could look something like this:

My favourite one
My personal favourite is the first option as I believe it is the easiest to get quick performance information from. Also, the structure just seems very logical and easy to understand without requiring further explanations. Most e-commerce sites just use the same structure of product groups that they have on their website.
How to choose the right campaign settings?
So once you have decided how you want to structure your Google Ads search campaigns it’s time to get started. Navigate to Campaigns and click the + button to create a new campaign.

Choose “Search Network Only” and move on to all the aforementioned settings.

Now choose “Create your campaign without a goal”. This way you aren’t restricted by predefined settings.

Fill in the Setup details as follows. Check the “Get website visits” option and enter your webpage URL.

When you’re just starting with Google Ads there’s no point in making things too complicated so here are instructions for which settings would most likely suit you:

Campaign name: Stay consistent when naming your campaigns. You can change the name later but try to come up with a clear system for naming that includes all necessary information to differentiate between campaigns. (See examples above)
Networks: You should stick to Search Network only (In most cases this is the best and probably also easiest option to start off with and get an idea of how Google Ads works). So untick the “Include Google search partners” option. And choose “No” under “Add Display Network”.
Locations: Choose the country/countries you want to target. If your budget is rather limited it would be advisable not to target the entire world. 🙂 Because then instead of getting great results somewhere you might get average or no results everywhere.
Now scroll down to the bottom of the page and click on “Additional settings”. Then click on “Location options” and make sure you select Target: “People in your targeted locations”.

Here you can read more about advanced location options.
Now scroll back up to where you left off.
Languages: Choose the languages that you want to target. Keep in mind that these languages indicate the language that people have set their Google search interface and language options to not the language that they actually speak.

So someone that lives in Austria and speaks German might have their Google search interface set to English. If your budget allows, you can choose the “All languages” option. If not, choose the languages that your target audience is most likely to use when browsing the web.
Budget: You can change your budget anytime but you do have to set some initial budget now. It can be as high or low as you please. While the daily spend may vary due to differences in search volume, Google makes sure that your monthly budget never exceeds your daily budget x 30.4. If you want to use a shared budget click Apply from Shared Library.

Delivery method (advanced): Click on the “+” and make sure that you have chosen the standard delivery. This is necessary for having enough budget to cover the entire day as opposed to spending your whole daily budget in the morning.
Bidding: This is something that you should test and set according to your goals and business. You can start with an automated bidding strategy so you wouldn’t need to figure out a bid amount yourself. Google will automatically set the bids to get you most clicks (traffic) for your budget.

You have the option of setting a maximum CPC limit if you have a specific bid amount in mind that you definitely don’t want to exceed. If you are only now starting with Google Ads advertising it would probably be good to even leave it blank for a little while to get an idea of how high or low the bids are in your industry. But do keep an eye on your Average CPC to make sure you don’t end up paying cosmic amounts for clicks (especially if you have a very large budget).
Once you have gathered some data and have an idea of the bids that are necessary to stay competitive in your field, you can switch to “Manual CPC” or test some other bidding strategies. Read more about bidding strategies here.
Ad extensions: I strongly recommend using ad extensions as it helps to increase your ad rank and ultimately enables you to lower your CPC. Extensions you should definitely use are:
- Sitelink Extensions
- Callout Extensions
- Structured snippets
- Call Extensions
- Review Extensions (if you have any third-party reviews to show)
If you have a brick and mortar store you should add the Location extension as well and if you have a contact number add the Call extension, too. Read more about extensions here.
Ad rotation: Make sure you have chosen the “Optimize: prefer best performing ads” option. If you create more than one ad in an ad group, Google will determine which one performs better and shows more of that ad.
Unless you are doing some A/B testing (which you probably shouldn’t worry about yet if this is your first time using Google Ads) then go for the “optimize” option.

Schedule: Unless you want your ad to only show during specific times of day you should leave everything as it is set by default. This way your ads will be shown whenever someone does a relevant Google search.
All other settings should be left as they are for now.
Once you click save and continue the next step is to start creating ad groups. The next article in the Google Ads Beginner’s Guide discusses ad groups. The way you build your ad groups is probably even more important that the structuring of your Google Ads search campaigns so definitely check back for great insider tips on that.
Insider tips
If you didn’t scroll here from the start, great job! If you did… you little rebel, I like you! 


But now go read the rest of it too, trust me, it’ll improve your Google Ads game even if you already know a thing or two. 🙂
1. Add a campaign that targets your competitors’ brand keywords
For example if your biggest competitors are TransferWise, HiFX, OFX and World First, you should allocate a small part of your budget to try to “catch” the people that are searching for those brands.

The keywords in your competitor’s campaign should be: transferwise, hifx, ofx and worldfirst.
Easy, right? If these brands don’t use Google Ads you are in luck because your ads will be shown above their organic results when someone searches for these brands.
If they are using Google Ads there’s usually no point in trying to get your ads to rank above theirs (as their ad relevance is obviously higher and competing would end up being very expensive and challenging for you) but at least you could have the 2nd or 3rd position and let people know that you are a great alternative that they should also check out.
2. Add a campaign for your own brand keywords to avoid someone doing this little trick mentioned in number one to you
If your site’s SEO isn’t great or you’re working on it and we all know it takes time… bidding on your brand’s keywords ensures you always show at the top the search results page when someone specifically searches for your brand.

The CPC is usually very low for these keywords. Make sure that the budget allocated to your brand campaign isn’t limited as this is usually the most effective source of traffic with the highest CTR (click-through rate).
A good place to read more about the benefits of brand keywords is here. However, there’s a but.. If your brand has great SEO, is ranked at the top of the search results and no competitors are bidding on your brand’s keywords, the necessity of using this strategy is debatable.
Conclusion
Cheers for making it this far and congratulations on starting with Google Ads or deciding to improve your already existing knowledge. Best of luck implementing and testing all this and see you on the battlefield!
Keep an eye out for the next articles in this series to find out how to build your ad groups to guarantee maximum success with lowest costs.

P.S. If you’d like to ask me something before the battle then feel free to write it in the comments below.👇